Budget Barbarian Builds That Actually Work: 3 Powerhouse Setups for Players Who Don't Have Perfect Gear
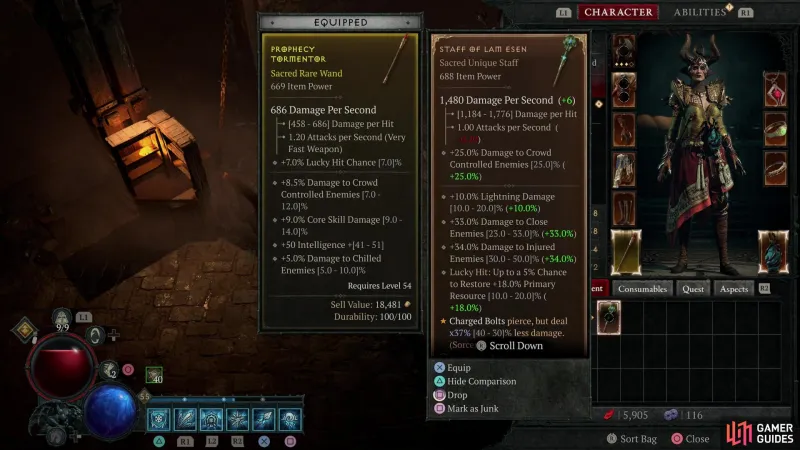
Photo: diablo 4 barbarian budget gear setup inventory screen, via alcasthq.com
Budget Barbarian Builds That Actually Work: 3 Powerhouse Setups for Players Who Don't Have Perfect Gear
Let's be real: most Barbarian build guides are written by players swimming in perfect Unique items, assuming you've got hundreds of hours to farm the exact gear they showcase. Meanwhile, you're sitting at level 65 with a mix of Rare items, wondering why your damage feels like you're hitting enemies with a wet pool noodle.
This guide changes that narrative. These three Barbarian builds perform exceptionally well with gear you can actually obtain, taking you from mid-leveling through Torment IV without requiring a single chase Unique.
Build #1: The Workhorse Upheaval Barbarian
Why This Build Works on a Budget
Upheaval Barbarian succeeds because its core mechanics don't rely on specific Unique items. The skill's inherent damage scaling and AoE capabilities carry you through content while you gradually improve your gear.
Realistic Performance Expectations:
- Comfortable Torment I-II farming by level 70
- Nightmare Dungeon tiers 40-60 with basic optimization
- Excellent Helltide efficiency for gear farming
Core Skill Setup
Primary Damage: Upheaval (5/5) with Enhanced and Furious upgrades Fury Generation: Lunging Strike with Enhanced variant Utility Skills: Rallying Cry, War Cry, Iron Skin Ultimate: Wrath of the Berserker for boss encounters
Gear Requirements (Realistic Tier)
Weapon Priority: Any two-handed weapon with high damage per second. Don't obsess over weapon type—a well-rolled Rare mace often outperforms mediocre Uniques.
Essential Stats to Target:
- Weapon: Damage to Close Enemies, Critical Strike Damage
- Armor: Maximum Life, Damage Reduction, All Resistances
- Accessories: Critical Strike Chance, Vulnerable Damage
Budget-Friendly Legendary Aspects:
- Aspect of the Expectant (easy to farm from Underroot dungeon)
- Edgemaster's Aspect (craftable, massive damage boost)
- Aspect of Disobedience (excellent defensive scaling)
Paragon Priorities
Focus your first 50 Paragon points on the starting board's damage nodes, then transition to the Bone Breaker board for physical damage scaling. The Exploit glyph provides excellent value once socketed.
Build #2: The Reliable Rend Berserker
Perfect for Consistent Progression
Rend builds excel because they provide both excellent clear speed and manageable resource costs. This version emphasizes bleed damage over time, allowing you to engage groups safely while your DoTs handle the heavy lifting.
Performance Highlights:
- Outstanding efficiency in density-heavy content
- Minimal micromanagement required
- Scales smoothly with incremental gear upgrades
Skill Configuration
Core Damage: Rend (5/5) with Enhanced and Violent upgrades Fury Builder: Flay with Battleworn enhancement for bleed synergy Defensive Tools: Challenging Shout, Iron Skin, Tough as Nails passive Berserking Enabler: Aggressive Resistance for consistent uptime
Gear Strategy for Real Players
This build shines because it transforms budget gear into effective tools through bleed damage scaling.
Weapon Focus: Prioritize attack speed over raw damage—faster attacks mean more bleed applications.
Armor Considerations:
- Chest/Pants: Bleed damage, Maximum Life, Damage over Time
- Gloves: Attack Speed, Critical Strike Chance
- Boots: Movement Speed (crucial for positioning), All Resistances
Accessible Legendary Powers:
- Aspect of Berserk Ripping (farmable from Mournfield dungeon)
- Blood-soaked Aspect (excellent bleed enhancement)
- Relentless Berserker's Aspect (extends Berserking duration)
Combat Approach
Engage enemy groups with Rend applications, then use mobility to maintain safe distance while bleeds tick down. This playstyle works exceptionally well with imperfect gear because positioning matters more than raw stats.
Build #3: The Accessible Whirlwind Spinner
Why Whirlwind Works Without Perfect Gear
Whirlwind builds often get dismissed as "gear-dependent," but this version focuses on consistent damage and survivability over peak DPS numbers. It's perfect for players who want active, engaging gameplay without complex rotations.
Realistic Expectations:
- Smooth progression through World Tier IV
- Effective Nightmare Dungeon farming up to tier 50+
- Excellent survivability during gear acquisition phase
Essential Skill Build
Primary: Whirlwind (5/5) with Enhanced and Furious variants Fury Management: Basic attacks aren't needed—focus on Fury cost reduction Defensive Core: Tough as Nails, Challenging Shout, War Cry Mobility: Leap for positioning and Unstoppable benefits
Budget Gear Optimization
The Secret: This build succeeds through attack speed stacking rather than perfect damage rolls.
Weapon Requirements:
- Any one-handed weapon with decent DPS
- Attack Speed as primary stat
- Critical Strike Damage or Damage to Close Enemies
Armor Priorities:
- Maximum Life and resistances for survivability
- Fury cost reduction where possible
- Movement speed for positioning
Game-Changing Aspects (All Farmable):
- Dust Devil's Aspect from Scouring Sands dungeon
- Aspect of the Relentless Armsmaster (weapon swapping variant)
- Windlasher Aspect for additional Fury management
Paragon Pathing for Budget Players
Start with damage nodes on the opening board, then prioritize the Flawless Technique board for critical strike improvements. The Exploit and Imbiber glyphs provide excellent value for minimal investment.
Progression Milestones and Upgrade Path
Level 50-65: Foundation Building
Focus on completing your core skill setup and acquiring basic Legendary Aspects. Don't worry about perfect stats—functional gear that keeps you alive matters more.
Level 65-80: Optimization Phase
Begin targeting specific stat combinations and upgrading to higher-tier Rare items. This is when you'll start feeling significant power increases.
Level 80+: Endgame Preparation
Start working toward your first chase Unique items while maintaining build effectiveness. These builds provide excellent platforms for eventual min-maxing.
Why These Builds Beat the Meta Trap
The dirty secret about Diablo 4 is that player skill and understanding often matter more than perfect gear rolls. These builds teach you fundamental Barbarian mechanics while providing genuine endgame viability.
Instead of chasing impossible gear requirements, focus on mastering positioning, resource management, and combat flow. You'll find yourself outperforming players with better gear who never learned these fundamentals.
The Bottom Line: Great builds work with the gear you have, not the gear you wish you had. These three setups prove that budget constraints don't have to limit your Season 7 ambitions.