Paragon Mastery Decoded: The Essential Node Navigation Guide for Every Season 7 Class

Photo: diablo 4 paragon board skill tree glowing nodes character progression, via www.theloadout.com
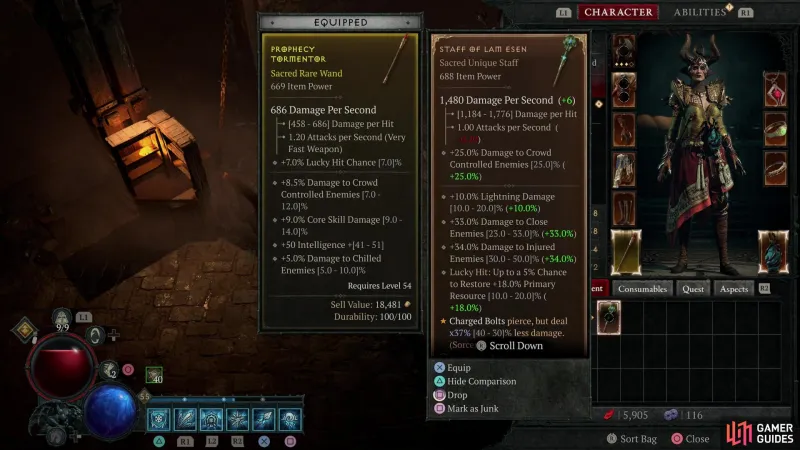
The difference between a struggling Pit 60 player and someone crushing Pit 100+ often isn't gear—it's Paragon board optimization. While most players randomly grab damage nodes that look appealing, the real power lies in understanding stat thresholds, multiplicative bonuses, and strategic pathing that creates exponential growth rather than linear improvements.
Understanding the Three-Tier Node System
Before diving into class-specific routes, you need to grasp how Magic, Rare, and Legendary nodes interact. Magic nodes provide flat bonuses that scale linearly, making them useful for reaching specific breakpoints. Rare nodes offer percentage-based increases that multiply with your existing stats. Legendary nodes fundamentally alter how your character functions, often enabling entirely new playstyles or dramatically amplifying existing ones.
The biggest mistake players make is treating all nodes equally. A well-placed Rare node can outperform five Magic nodes, while the right Legendary node can double your damage output overnight.
Barbarian: The Foundation Builder's Approach
Barbarian Paragon optimization revolves around establishing solid defensive thresholds before pursuing damage multipliers. Start by securing 60% damage reduction through the Bone Breaker board's defensive cluster, then pivot toward Wrath or Blood Rage depending on your build archetype.
For Upheaval builds, prioritize the Decimator board's Two-Handed Weapon Expertise nodes, which provide multiplicative damage scaling that compounds with your weapon's base damage. Whirlwind builds benefit more from the Carnage board's Berserking nodes, creating a feedback loop between fury generation and damage output.
The critical insight most players miss: Barbarian damage scales exponentially with proper fury management, not raw damage percentages. Focus on nodes that extend Berserking duration or reduce resource costs before chasing damage multipliers.
Necromancer: The Multiplier Maximizer
Necromancer Paragon boards offer the most complex decision trees in Season 7, with distinct optimization paths for Summoner, Blood, and Bone archetypes. The key principle is identifying your primary damage source and building multiplicative layers around it.
Bone Spear builds should rush the Bone Graft board's Critical Strike nodes, as each percentage point of crit chance multiplies with your existing Vulnerable damage and Essence bonuses. Army of the Dead builds require a different approach—prioritize the Hulking Monstrosity board's minion damage nodes, which scale with every summoned creature.
Blood Necromancers face a unique challenge: balancing offense with the Life management required for Corpse Explosion chains. The Blood Begets Blood board provides the perfect solution, offering Life on Kill nodes that enable aggressive positioning while maintaining resource flow.
Sorcerer: The Elemental Efficiency Expert
Sorcerer Paragon optimization demands understanding elemental damage buckets and how they interact with your chosen specialization. Fire builds benefit most from the Burning Instinct board's burning damage nodes, which multiply with both direct damage and damage over time effects.
Ice Sorcerers should prioritize the Frigid Fate board's Vulnerable application nodes, as frozen enemies take multiplicative damage from subsequent attacks. Lightning builds require the most precise pathing—the Static Surge board's Crackling Energy nodes create a damage feedback loop that scales exponentially with enemy density.
The universal truth for all Sorcerer builds: Mana efficiency nodes often provide more DPS increase than raw damage nodes by enabling sustained casting during extended encounters.
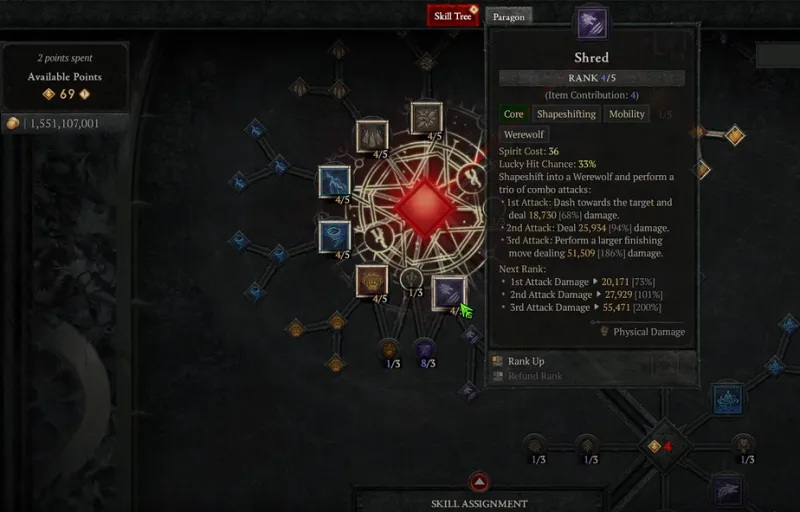
Druid: The Transformation Specialist
Druid Paragon boards reflect the class's dual nature, with separate optimization paths for Shapeshifting and Elemental builds. Werebear builds should rush the Ursine Strength board's damage reduction nodes, as survivability enables the close-range positioning required for Pulverize's maximum damage.
Werewolf builds benefit from the Lupine Ferocity board's attack speed nodes, which multiply with Shred's inherent speed bonuses to create devastating hit-and-run capabilities. Hurricane builds require a different approach entirely—the Natural Disaster board's area damage nodes scale with both tornado count and enemy density.
The critical insight: Druid damage scaling depends heavily on form management and resource efficiency rather than raw damage percentages.
Rogue: The Precision Pathfinder
Rogue Paragon optimization centers on maximizing Critical Strike synergies and combo point generation. Twisting Blades builds should prioritize the Exploit Weakness board's Vulnerable damage nodes, which multiply with the skill's inherent damage bonuses.
Ranged builds benefit from the Ranger board's attack speed and movement nodes, enabling the kiting patterns required for sustained DPS. Trap builds require the most complex pathing—the Tricks of the Trade board provides cooldown reduction nodes that enable continuous trap placement.
The universal principle: Rogue damage scales multiplicatively with positioning and timing, making mobility and resource efficiency more valuable than raw damage increases.
Spiritborn: The Synergy Synthesizer
As Season 7's newest class, Spiritborn Paragon optimization is still evolving, but early patterns favor builds that maximize Guardian Spirit synergies. The Spirit Hall board's offering generation nodes create multiplicative scaling with all four Guardian aspects.
Centipede builds benefit from the Venom board's poison damage nodes, which stack with the Guardian's inherent damage over time effects. Eagle builds should prioritize the Sky Hunter board's movement and attack speed nodes, enabling the aerial positioning required for maximum damage.
The emerging meta suggests Spiritborn power scales exponentially with proper Guardian rotation and offering management rather than traditional damage stacking.
Common Pathing Mistakes That Cap Your Damage
The most expensive mistake is pursuing damage nodes before establishing defensive thresholds. Every class requires specific damage reduction percentages to survive higher Pit levels—chasing offense without proper defense creates a damage ceiling you'll never break through.
Second, most players undervalue resource efficiency nodes. Mana, Fury, and Essence management often provide more DPS increase than raw damage percentages by enabling sustained combat during extended encounters.
Finally, ignoring movement and utility nodes severely caps your practical damage output. Mobility nodes enable better positioning, while utility nodes like cooldown reduction often provide multiplicative benefits that exceed direct damage increases.
Building Your Personal Optimization Strategy
Successful Paragon optimization requires understanding your build's damage formula and identifying the most impactful multipliers. Start by reaching defensive thresholds, then focus on nodes that multiply with your primary damage source.
Prioritize multiplicative bonuses over additive ones, and remember that utility nodes often provide hidden DPS increases through improved uptime and positioning. Most importantly, adjust your pathing based on your current gear—the optimal path changes as you acquire better items with different stat distributions.
The path to Pit 100+ isn't about finding the perfect build—it's about optimizing the build you have through strategic Paragon allocation that amplifies your strengths while covering your weaknesses.